Ticker Factory

Sunday, December 7, 2014

Baby Kiera

A few months back I posted some pictures of the beginning of a baby quilt.  In my rush to get it wrapped and taken back home when Cody made a surprise visit, I forgot to take a picture of the finished quilt.  Baby Kiera was born and I forgot about it until Angie sent me pictures of Kiera on her quilt.


Monday, December 1, 2014

Christmas came early!

I am so thrilled to have a room of my own to sew, quilt and scrapbook.  Larry has worked very hard for a few weeks to renovate his basement office into a craft room for me... my birthday, Christmas and anniversary present (all within 8 days of each other).   It was no small feat to haul everything upstairs from Larry's office and haul everything downstairs from my old teeny craft room.   I thought with such a large room it would look bare... not so much! I had supplies squirreled away in my tiny craft room, in a large closet and a spare bedroom.  It will probably need some fine tuning so that everything is where it should be.

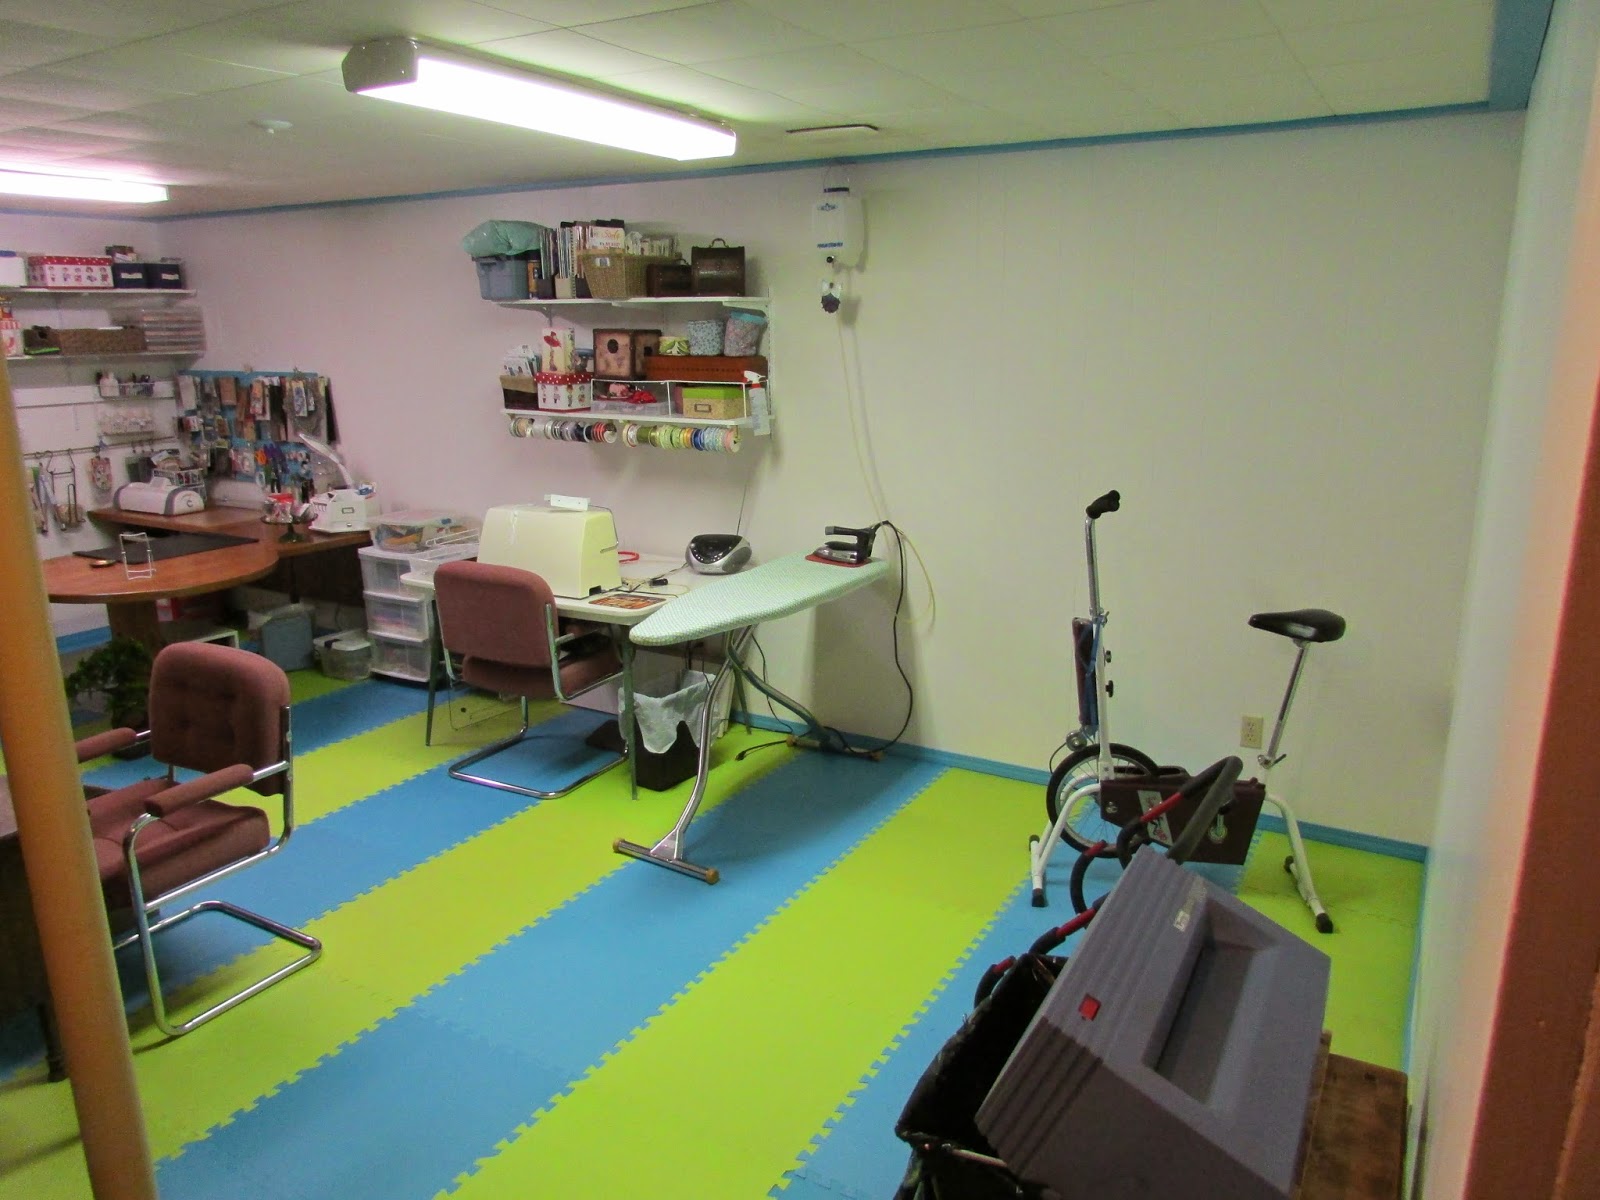
I should have taken a before picture.  The windowless room was so incredibly dark and dingy with its 70's "economical" finishing and the ugliest yellow/brown/rust carpet I've ever laid eyes on.  The walls were dark brown panelling.  When Larry removed the panelling to see what kind of insulation was there; he wasn't surprised to find there was no insulation at all.  I asked to have the rubber connect-a-mat flooring for warmth and comfort and it is so awesome to stand on! 

From the foot of the stairs from left to right, here is my new room. 


Next project is to make covers for the burgundy chairs that don't go with the room colours.


My poor little antique chiffonier needs to be refinished (that will happen this spring hopefully).  I was fortunate to inherit the oak desk and corner cabinet that Larry had custom-built for him when he was transferred back from Saskatoon as Branch Manager.  When Larry's employer sold to the US company it wasn't long before they starting shutting down branches including ours.  Larry's job changed to that of a travelling sales rep so all the furniture came home to our basement where Larry intended to set up his office.  It wasn't long before he couldn't stand the dark, dingy room so brought his laptop and phone upstairs and used the kitchen table.


After many days of hauling and reorganizing equipment and supplies, I can finally get back to doing what I love to do.  Well; after I hem all the pants and catch up on the ironing.   Every time I go to do something I discover more supplies that I have to find room for downstairs.  The thrift store is benefiting from all of the sorting and purging that we have been doing!

Wednesday, October 1, 2014

BABY MINI ALBUM

I have been wanting to make a mini album for a long time and have finally attempted it.  Because I have a nephew whose wife is having their first baby in November, and because I have been off work recovering from knee surgery, I decided I'd make a baby album for my first attempt.

Actually, today is my first day back to work.  I started working half days so that I'm not sitting for too many hours.   I am back home and have had to elevate my leg and ice my knee... that explains the angle of the photos.  My nephew and his wife have decided not to find out the gender of their baby so this was challenging to balance gender-neutral colours.  I ended up using blue and pink anyway, along with cream tones, green, yellow and brown.  Most baby mini albums I've seen on other blogs were done specifically for girls and were very frilly with lots of flowers, jewels and lace... in other words, just gorgeous.  Because my album had to be gender neutral I had to forego all the feminine touches. 

As this is my first attempt at a mini album, I decided to use a purchased cover.  This is a Tim Holtz product that came without the binder ring which I purchased separately.  Although not "babyish", I liked the vintage look of the cover.  I attached an envelope to the inside cover of the book using double sided tape. I cut card stock to 6" x 8" so that the pages are slightly smaller than the cover and used a purchased wooden frame on the first page.   A smaller piece of card stock has been used to create a pocket.

I used two of the three frames that were in the package I purchased from Michaels.  Double sided tape has been used on 3 sides of this frame so Angela can slide a picture in the top.  


I printed various images I found on the Internet.  The left page has a pocket created by tacking down 3 sides of card stock that allows Angela to write some notes about pre-birth thoughts, baby showers, etc.   I know from Facebook that she has been taking pictures of her growing tummy at various stages so have made mats for three "baby bump" pictures.


I created a pocket between pages 9 and 10 of the album by putting two pieces of card stock together with double sided tape and leaving the side open.  I've made a double sided photo mat that slides into the pocket and the pocket is roomy enough for Angie to add more photos.


 I've left the top of this photo frame open to slide a picture in and I've used the narrow double sided tape on the three remaining outside edges to allow for the picture to be under the frame.


There is a growth chart on the left page and I've made a hinge with scrap card stock to attach a double matted booklet to the right page. 

The sand/green tone pre-printed card stock had 6 different designs postcard-sized so I have used one here to add a little interest and place for titles and comments.

I've tucked another envelope into a pocket on the left page and added a postcard-sized card stock page on the right to which I've glued a fussy-cut image from the original 6-card pre-printed card stock (that I've probably had in my stash for 5-6 years).  


The reverse side of this postcard-sized page has purchased paper/leather baby shoe stickers attached to it (one of my big splurges).  


Because the book wasn't too stuffed yet; I added a couple blank pages for Angie to expand the book.

Next time I will attempt to make and bind my own cover (maybe).  The binder format sure simplified the process.  It took me a long time to choose the card stock that I was going to use and to find, print and fussy-cut out all the images I wanted to use but the actual process of putting the book together took one day.  I should have taken a picture of the complete disaster my table was while making the album!!

Wednesday, September 3, 2014

Nephew's wedding


I wasn't able to attend my nephew's wedding in St. John's Newfoundland on July 5th as I had knee surgery scheduled for July 16th.  So, I'm living vicariously through my sister to get pictures of Nathan & Renee's wedding.


Thursday, August 7, 2014

A Colour Blocking Layout

I did have a successful total knee replacement (right) on July 16th.  I'm just over the 3 week mark of my recovery.  Ambulatory but it is a long, slow process.  

My great idea of quilting while recuperating hit the wall when I started having issues with my sewing machine.  That put aside, I worked on some layouts.  

I had the same paper (centre) that Susan Hope (Canadian Scrapbooker magazine, summer 2014) used so I scrap-lifted her background for my pictures of Smashed In Head Buffalo Jump and the colourful native dancing we watched.


Tuesday, July 15, 2014

Anticipation

I haven't been on here for awhile.  For the last three months I've ramped up the physical fitness routine with the goal of becoming healthier before my knee replacement surgery... which happens tomorrow sometime.  I'm waiting for the call from the hospital and reading a Hip & Knee Replacement Forum (Bonesmart) that I discovered this morning.

I'm hoping my initial 6 weeks of recovery won't be entirely filled with resting on an incline to reduce pain/swelling, range of motion exercises, anti-blood clot exercises, walker walks and icing.  I'm planning to do some scrapbooking (of course) and make a/some baby/toddler quilt(s).   Yesterday I started cutting out the fabrics for a quilt I found in Fons & Porter's 2014 summer issue of Love of Quilting, "Ladybug! Ladybug!"  Of course I searched Fabricland and five different quilt shops for the white print and couldn't find it... must be too new.  But the one I found will work just as well.  I fell in love with the quilt because I love green, ladybugs and bright colours.  Hmmm, anyone think this is too bright for a baby blanket?  Toddler, maybe.


That is just like me - start a new project instead of finishing other projects or cleaning & organizing the disaster area known as my craft room!

Wednesday, June 4, 2014

The Green Cat Story - first collection, "The Sweetest Thing"!

New designer alert!!   Gorgeous cardstock from Elena Morgun, of Ukraine.

If I hadn't been blog hopping and made a stop at Helen Tilbury's blog, "Scrap Addict" http://helentilbury.blogspot.ca/ I would not have discovered Elena's very first, beautiful scrapbook paper & sticker collection - THE SWEETEST THING here.  It is soft and oh so pretty!   The new company is called The Green Cat Story.


  and separate papers:


These aren't copying right for me so use the link and check it out.

Moments of Tranquility

Hop on over to Natasha Naranjo Aguirre's blog, Moments of Tranquility.    She is generously giving away two beautiful giveaway packages in June.  Gorgeous card stock, Dusty Attic frame, chipboard and flowers!  Check in a Natasha's site HERE.


Thursday, May 1, 2014

Tags

It has been a long time since I have been here.  I've concentrated more on doing challenges and updating the Scrappy Ladies blog.  But lately I have had a lot more time on my hands and have been playing with ink again.  I took time off from doing challenges and have been experimenting/playing with making tags.  Some of the ideas have been scrap lifted from various talented people (posted on Pinterest) with my own spin on them.


Sunday, February 23, 2014

Off the Page

I've been wanting to make something three dimensional for a long time.  I have seen so many cool objects made on various scrapbooking sites so just had to try it.   Glad I wasn't making it for anyone because it sure isn't perfect!  But, its my first 3-D project so its good to learn through my mistakes


This dresser starts out with Dollar Store match boxes.  I found two brands; the box is a bit deeper with this brand.   I pulled all the boxes apart and used acrylic paint to paint all sides of the drawers.  While they are drying you can together 3 or 4 of the outside portion of the match boxes but don't let the glue completely dry before putting the drawers back in.  I did and some of the slides were slightly warped from the spring clips I used to hold them together while the glue was drying.   
     Being a bit of a collecter (ha ha, that is putting it mildly), I save the cardboard backs off 8.5" x 11" pads of writing paper from work as we go through tons of them. So I had plenty of them.   I cut them to size to glue to the sides of the rows of drawers; and one in between the two sets of drawers.  I left the boxes apart for this stage but should have put them together first.   The process of gluing and clamping the slide portions slight warped some of them and the drawers were hard to put back in.  If you do leave the drawers in the box when you glue the sides to the cardboard, make sure you don't have the dresser drawers pushed all the way in when you do this or the drawers may be glued permanently shut when you glue the cardboard onto the back of the dresser. 
        You know those glass "rocks" you can buy at Michaels to put in the bottoms of vases  - the ones that have one flat side?   That is what I used for the handles for the drawers.   The little flower pot was another Dollar Store find painted with the same paint.   Originally, the dresser did have a mirror on the back.  Turns out the mirror was far too heavy and I needed a metal brace at the back to keep it from tipping the dresser over.  Instead, I decided to go with the Dollar Store wooden frame painted with gesso.  
       The phone is a metal embellishment I found at Walmart and the lamp is Dusty Attic chip board that has been primed first with gesso and then I used Copic Markers to colour the Tiffany glass designs and the base.

Wednesday, February 19, 2014

Canvas

I didn't think that I would ever get this canvas done as I restarted it; then decided I liked the first version better and went back to work on it.  I wanted to buy a small plaque similar to this from a catalogue but the shipping fees were outrageous.  Canadian shoppers are often penalized with much higher shipping fees even though the distance is sometimes less than shipping it from one US state to another.    So... here is my version of that same plaque.


Tuesday, January 21, 2014

Crop Weekend!

I had a fun weekend scrapbooking with a co-worker, her cousin and her aunt.  Despite staying home Friday evening because I was feeling tough after the orthopaedic surgeon examined my knee that morning (twisting, turning, poking until it throbbed like your worst toothache), I still managed to get 10 pages done:  four double layouts and two single pages, all except one were photos from my family/friends Scrapbook Retreat in southern BC last October.  

I loved this paper when I bought it and thought it was perfect for a layout about a water colour painting demonstration.


This title of the next double layout was supposed to be, "Visitors" (as in 2 people who dropped in to visit us) ... until I discovered my sheet of letters only had the one "s"!  Don't you hate when that happens??


It rained off and on during our weekend so when the sun came out we took full advantage and grabbed our cameras and headed outside.  We had some fun goofing off and learning how to use the timers on our cameras.  At one point we had five cameras lined up with timers on.


And, of course, I can't forget the food we prepared and snacked on.   This page was the Scrappy Ladies'  (http://bcandabcroppers.blogspot.ca/) January Challenge, week 3, using a scraplifted mood board:


The seriously challenging mood board borrowed from My Creative Scrapbook's blog, (http://www.mycreativescrapbook.blogspot.ca/):