Ticker Factory

Tuesday, December 31, 2013

Anniversary Gift to my Husband

Don't you hate when you have a vision in your mind and no matter how hard you try, the version that you create is just not the way your mind sees it?  

This is attempt #2 and I now give up.  Its the thought that counts, they say. I couldn't even get a good photograph of the canvas that I made my husband; likely because I used Americana Triple Thick Brilliant Brush-on Gloss Glaze as a protective finish... extremely shiny and reflects the light.  The picture looks like everything is flecked with white, but it is just the gloss finish making it look like that.  Sigh.  Now to take turpentine (or?) to remove the goop on my first attempted canvas so it can be repurposed!


Here are a couple pictures taken of Maggie at Christmas.  She has just "unwrapped" one of her new toys - a hedgehog. 


 Maggie doesn't make it easy to keep the place tidy.  She has hauled 3/4's of her toys up onto her favourite spot on the couch.  The good news is, there is less on the floor to trip over!


Tuesday, December 17, 2013

Last Canvas before Christmas

My sister-in-law has an earth-tone country scheme to her home so the canvas I made for her (below) was done by sponging 5 different metallic paints over a matte paint base coat:


The lighting wasn't right for taking the picture and, I didn't take a progression of pictures due to poor winter lighting conditions (working on it in the evenings).   I used Folk Art Artists' Pigments:  a base coat of 43 Burnt Sienna.  When the base coat was dry, I used several small sea sponges (soaked first in water and squeezed out) to haphazardly sponge various FolkArt Metallics all over the canvas, including the sides:  577 Sahara Gold; 662 Silver Sterling; 663 Solid Bronze; 666 Antique Copper and a touch of 2484 Champagne.   If I wasn't crazy about the colour in a spot I grabbed a different sponge and tapped some more of a different colour.   I think the layering of the different coloured paints gives it more depth.  Because of the metallic pigments and light refracting off it, its hard to get a good photograph.


The wagon wheels are Dusty Attic chipboard stained with 3 different Tim Holtz's distress inks.    The mini birds are also Dusty Attic chipboard.  I used grey ink, a touch of white ink and a touch of yellow on these after the base coat of white gesso had dried.  I like to paint the chipboard with gesso first.  If you don't the cardboard absorbs the ink and you get a "watered down" colour.  If this is the result you are looking for then you don't need to paint it first with gesso.    The metal stickers are from Momenta.

I sure hope my sister-in-law likes it.  Because I had to "mute" the colours down from my previous two bright canvases, I had more difficulty doing this one.  LOL!

Monday, November 25, 2013

Mixed Media Canvas

I am so happy that I finished another canvas... one left to go for Christmas gifts.   


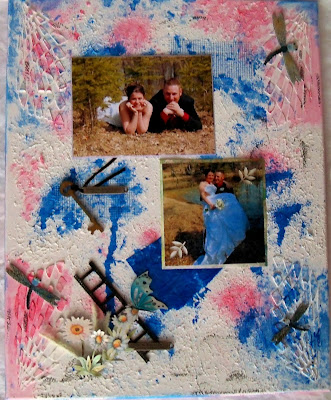
I used a Dusty Attic filmstrip and, I'm ashamed to say, that I'm not sure which company the butterfly or dragonflies are from!   I had prepped a lot of pieces of chipboard so they were readily available when I wanted to use them.  They didn't get back into their packages as I had them spread out to dry.     The third canvas will be much more sedate as it is for the mother of this bride and the previous canvas's groom.  LOL!

Sunday, November 24, 2013

MIXED MEDIA CANVAS

I am trying to make some Christmas presents.  It will be here before we know it and, as usual, I decided to take on some projects that I should have started a month ago.   Hmm, that reminds me, I should really dig out the address book and Christmas cards and attempt to write some letters. 

Anyway, I've seen and admired enough canvases on scrapbooking websites that I finally got brave enough to attempt it.    My first attempt is for my nephew and his wife who were married this August.  A country wedding that I enjoyed so much!   We stayed at the Lazy M Ranch near Red Deer.  Most of the family stayed in the Lodge and the groomsmen stayed in the apartment suite on the second floor of what used to be a horse barn but now was a large hall with a stage, a kitchen, bathrooms and showers.  My husband and I parked our motor home in the lawn area near the hall. 


The wedding theme was country and the bride used burlap and brightly coloured flowers to decorate. 
 This was so much fun to do... a lot of prep work and steps and waiting in between steps for things to dry naturally so they cured.  I used Golden Mediums molding paste and a Dylusions stencil in all of the canvas's corners.  Then I experimented with texture on the rest of the canvas by spreading molding paste with a plastic spatula and pouncing it with a stiff plastic wrap off an embellishment package I had opened.
 When the molding paste was perfectly dry I used a blue Perfect Pearls spray and then a red one that I knew looked more like pink.  Because blue and orange/coral was in the bride's wedding colours I added a few spritzes of Dylusions orange spray ink.   


My nephew and his wife had a heart-shaped glass bottle on the table where they signed the register and they took turns pouring different coloured sands into it while their guitar player played beautiful music.   That stuck out in my mind so I had to try to recreate the bottle of sand.   I decided on a Tim Holtz corked bottle that I tipped on an angle to pour crystal and copper seed beads into it.  
 
The original bottle
 
While camping this summer we drove down a road thick with tall wild grasses on each side.  Something about those grasses... I rode my bicycle back later with scissors and a plastic bag and gathered a bag full.  I knew I'd find a use for them sometime.  I poured a little gesso onto plastic wrap and put a few stems of grasses down, folded the wrap over them and rolled them around and squeezed the gesso so that the grasses were fully coated.   Then gently slapped each stem on scrap paper to remove any excess primer.  I thought the gesso would protect the stems and keep them from drying out/falling apart over time.   The entire canvas is sprayed with a matte protective coating at the end so that should keep them together.    The key is a wooden embellishment I likely bought at Walmart.  I like digging through their $1, $2 section of trinkets for findings I can use in crafts.  I found these pretty blue beads that were very close to the bride's choice of blue so threaded some of them onto hemp string and tied them onto the key.


The Dusty Attic chipboard circle scroll seemed like a great choice for the hands picture.   The outside picture is one of my nephew and his fiance' making a heart with their hands.   I cut out the background showing in the heart they made and arranged this photo over top of the photo of their hands after the wedding ceremony.     I painted the chipboard with gesso first to seal the cardboard and when that was dry I used an acrylic metallic gold paint.  To give it a slightly antiqued finish I touched the chipboard here and there with my pinecone brown stamp pad.


I cut various different widths and lengths of blue card stock, wood-grain and faux peeled-paint cardstock and inked all the edges with my favourite, tiny Versa Color stamp pad in 171 Pinecone.  I'm sure it is the most used stamp pad I own; then layered the strips of paper until I had a haphazard arrangement that I found pleasing to the eye. 


The metal word stickers are from Momenta.
 
I have another wedding canvas to do for a niece that has already been prepped with molding paste; so I'm anxious to get started with some ink.   
 
I have a hospital procedure tomorrow so I'm on clear fluids today and I'm not sure how much I'll be able to craft this afternoon due to prepping for the procedure.   Hopefully I'll get to play a lot this afternoon as I love to get my hands covered in molding paste and ink! 


Wednesday, November 6, 2013

How long ago was Thanksgiving?  My time is not my own any more.  I didn't even get through the second sentence when the reason for this started barking at me.  Dear Maggie is now in my lap licking my fingers and making normal life difficult... again.  Tell me - what possessed me to believe I was young enough, vibrant enough and - need I say - patient enough, to be the proud parent of a nine month old puppy; who, by the way, has now turned around and is trying to bathe me while I type.  Sigh. 

All these weeks and I've only accomplished three layouts.   I have been enjoying playing with texture with two of these wedding layouts of my nephew, Cody, and his wife, Angela, as their wedding theme was country style and included burlap in their decorations.


 I finally got to use a beautiful Pion cardstock that I've been wanting to use for a very long time.  The last layout lent itself beautifully to the frame design and made for a very simple page that I am happy with.

On a different note, anyone who has hit upon my blog in surfing knows that it is related to my creative life.  A diary if you will.  I am confused as to why I am receiving anonymous comments such as the following.

link exchange is nothing else however it is simply placing the other person's blog link on your page at appropriate place and other person will also do same in support of you.
Feel free to surf to my web page-> free Minecraft accounts

I don't use any form of advertising on this blog.  It is strictly for personal enjoyment and has no monetary value whatsoever.  If I do add a link to my blog it is  a scrapbooking or craft blog I find enjoyable.  That is what you can expect to see here.  Thank you for stopping by for a look.   Time to get to work!

Tuesday, October 15, 2013

Happy Thanksgiving

... a little late.  We had a Thanksgiving to remember - a new puppy joined our family this weekend.  Maggie is an 8 1/2 month old Shih Tzu and really sweet.  She wants constant attention though and is a real "talker".  Our older boy, Coco, is not impressed, however and is wondering when she will be going back where she came from.  Sigh.


We gave her a sweet potato puppy treat


Maggie is the reason my craft room finally got straightened out - it had to be Maggie-proofed.   I LOVE scrapbook retreats; but it sure does a number on my room.  Maybe now I can finally get back to finishing the pages I worked on at the retreat.  I think I got 17 pages done but I need to add journaling to them before they are really album ready. 

I've been noticing a lot of really great Halloween ephemera and clip art on Pinterest and in the stores which has me interested in making cards.   Hopefully this weekend Maggie will have settled in more and I can actually get something more done than laundry and housework. 

Here are my Halloween nails done by Cheryl of Pinkieswear:

Sunday, October 6, 2013

2013 Scrapbook Retreat near Nelson, BC

Absolutely rejuvenating!  I so enjoyed our four day retreat in the Kootenays! 

Kokanee Glacier Resort was the perfect venue with the use of the breakfast room that is only used by the owners in July and August.  Shaun and Laurie were so gracious in allowing us free reign to move all of their tables, chairs and decorations around so we could set up rows of tables to work on and stations for a water colour demonstration, an embossing demonstration, a stamping/inking station and another for the Cricut and Cuttlebug.


Too bad I don't have time to play on here... do I ever have a lot of clean up to do!   But I'll be back...

Thursday, September 12, 2013

More British Fascinators

I finished two more fascinators last night -- who knew they would be so much fun to make... kind of addictive actually!


Tuesday, September 10, 2013

4th Annual Scrapbook Retreat

Finally have a retreat booked for this year and we are all extremely anxious to go!   It will be held at Kokanee Glacier Resort on Kootenay Lake, BC, September 28th to October 1st. 

Carrie asked us to bring special hats as one of our breaks is going to be a "tea" social.   I don't really have a special hat and had to strain my poor little brain very hard... I came up with the idea of making British "fascinators" similar to what the women wore to Prince William and Kate's wedding last year.

I've made four so far and have another one cut out and ready to start.  Who knew it would be this much fun!!


Sunday, June 9, 2013

Nails with Bling!


Love the bling Cheryl added to compliment the nail colour!

Tuesday, April 9, 2013

Air Dry Modeling Compound ~ aka Paper Clay

Martha Stewart Silicone molds and paper clay make fast and fun embellishments.  I thought I'd try the 4 piece kit of leaves, fern, butterflies and flowers. 


You twist the molds and carefully release the pieces and leave 24 hours to dry/cure.  Some paint brushes and simple watercolour paints and you have some 3d embellishments for your layouts.  This is only one coat of paint.  I used inks for the leaves. The fern leaf is very fragile and breaks easily. 

Saturday, April 6, 2013

Using Everyday Things Around the Home

Saw this on Quilting Daily's newsletter and, of course, I had to try it.   You take a whole head of celery and slice about an inch off the end, slicing as evenly as you can.   Ink the celery and stamp a rose!


Thursday, April 4, 2013

Watercolour Painting on Fabric - Finished

I have finally finished painting (and ironing to set the paint) and now to find the right size of canvas to mount the painting on.  Yes, it is supposed to have a mottled background, although I could have done a better job blending it!  This was painted over the course of many days.  Its not perfect but not too bad for my first attempt.

Friday, March 29, 2013

Watercolour - Step 3

Who knew watercolour painting on fabric would be so relaxing!?  I think its a form of meditation.   I was handed a Margarita so thought I should back away from the paint and wash it off of my hands.   I'm working on the background now, which takes a steady hand.  Still fun though. 


The background is supposed to seep and create shadows.  Hopefully mine won't look too blotchy when I'm finished.    Think I will touch up the fruit once the background is finished.

Wednesday, March 27, 2013

Watercolour on Fabric

A cousin of my husband is back from a two year mission in France and we were supposed to all meet at an aunt and uncle's place tonight.  Unfortunately, one of Taffy's grandchildren was hospitalized and she didn't make it down here.  Our visit has been postponed; but I was able to work on the second stage of my fabric painting. 

Step 2:  This time, the paint isn't watered down as much and you paint on dry fabric.  The colours are deepened and shading is added.  The background hasn't been touched yet.


There is still some bleeding of the colours into surrounding areas.  The background will be varying degrees of blue and should absorb much of the bleeding.
 
A comparison after drying last night and after drying tonight:


Tuesday, March 26, 2013


I couldn't wait to start a new project once I saw a painted table runner in Cloth Paper Scissors.  What was utterly amazing was the amount of fabric that I've collected (hoarded) over the years. I rediscovered what I had while looking for a plain piece of white cotton that I could use to do a water colour painting.  If it turns out, maybe I'll mount it to a canvas to sit on the fireplace mantle.

Figure 1:  pattern


Trace the pattern with a permanent black marker onto white cotton.   Lay the cotton on a plastic covered surface and spray the fabric with water.   With watercolours and paintbrush, start with the lightest colour first working your way up in colour depth (Fig. 2).  I started with yellow, then pink, blue, green, purple (Fig. 3).  This first staining of the fabric is done with very watered down paints.  This is a lighter, transparent layer so less paint is better. 

Figure 2:


Figure 3:


I'm not a patient person when I have to leave things to dry before I can go on to the next step... let the fabric dry on a rack.    The second layer of highlights and shadows is painted onto the dry fabric to make any lighter areas darker and less muted.  Then add a darker background colour, which will seep and create brilliant shadows (so they say).    So for now, goodnight!

Sunday, February 24, 2013

Moments of Tranquility

For inspiration for your own scrapbook layouts, and a chance to win a fabulous 20 piece Dusty Attic Giveaway, check out Natasha Aguirre's "Moments of Tranquility" Blog and Store here.  Natasha is doing up a pre-order of Dusty Attic and anyone wanting to order can submit a  pre-order of Dusty Attic laser cut chip board.


Thank you Natasha for the opportunity to pre-order hard to find DA pieces and to win your awesome giveaway!

This is my first "manly" layout I have attempted of my husband laying wood flooring in our Family Room.  I have used several Dusty Attic chip board pieces here:  Door #1 DA0692 which I inked with various different Tim Holz Distress Inks to achieve an old worn out look; small locks and keys DA0679; Door Handle Plates DA0681.  I also used the Brick Wall Panel DA0316 as a mask using homemade dimensional paste and the brick pieces inked with Tim Holz's Aged Mahogany.   The clock is from Scrap FX and is merely inked with Tim Holz's Weathered Wood.